Click on images to see them in full screen
smsPULSE for Windows
Quick Guide
This document provides a summary of all administrative tasks at high level.
Basic installation - overall process
- Download the software from the smsPULSE.com website
- Run the installation program, called setupServer32.exe or setupServer64.exe, on your server (please ensure that you have the correct installer for your platform)
- If you intend to enable smsPULSE for MMS and wish to use automated image processing, please download one of the Image processing installers, for the same processor type as above. From V8 you will also need to install the Java JRE 32 bit and install it before running the software

- For all configurations, you will be able to access the Admin Interface of the system using your browser, pointing at the server and then /smspulse/smswebui.nsf
- Install your "registration file". Use the Web Admin Interface to upload a "Key File" on the Configurations Tab. The file name is "smspulse.reg" and you can find it embedded in your account record on smsPULSE.com. To obtain it, please login to your smsPULSE.com dashboard, then click "Edit Account". The file is attached at the bottom
- Run the smsPULSE proxy configuration utility, smsproxy.exe (this is installed in the program directory)
- Open port 443 (HTTPS) on your Firewall for outbound traffic
- Create your TAPI devices now - smsLINES saves you time by finding these and creating Communication Lines documents for you (type GSM). If you wish to create MMS Communication Lines you will need to create these documents later, or convert an existing line from GSM to MMS
After running the installer
Please follow these instructions for quick results:
- Double click on the icon titled smsPULSE Server, on your Windows Desktop.
- The server will start, create databases, and prepare the environment.
- Wait for around 30 seconds as the server will perform some delayed functions
- Once the server is done (the screen will become stable), type Q on the console and hit return - the server will exit
- Now start the server again - you are done.
- You are now ready to run the smsPULSE program for the first time. You will be running in "Evaluation Mode".
Please note that your evaluation automatically uses our International Account type. If you are evaluating smsPULSE in the USA you will need to tell smsPULSE about this. To evaluate using a Qtel account please contact support@smspulse.com. For more information about different accounts please see here .
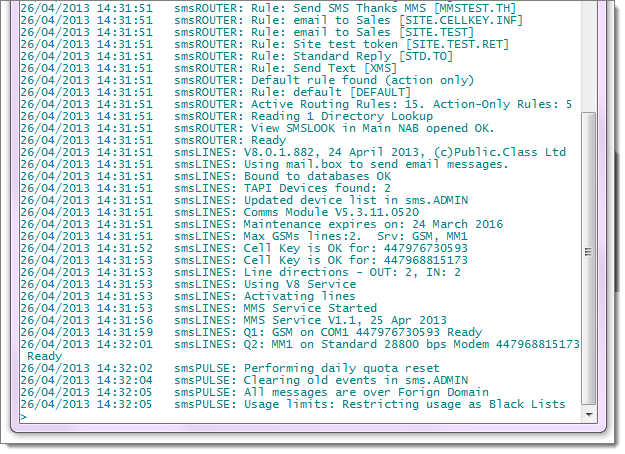
Server Console
This is how the console looks when the installation is complete.
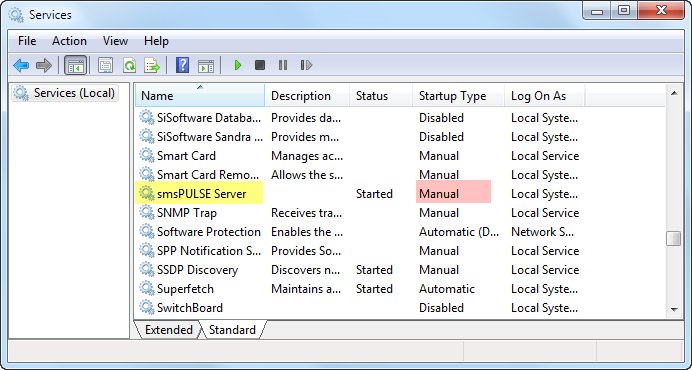
 Windows Service
The Server is also installed as a Windows Service. Its state is Manual. You can change this to automatic - Windows will start the server as a service next time the machine starts.
Windows Service
The Server is also installed as a Windows Service. Its state is Manual. You can change this to automatic - Windows will start the server as a service next time the machine starts.
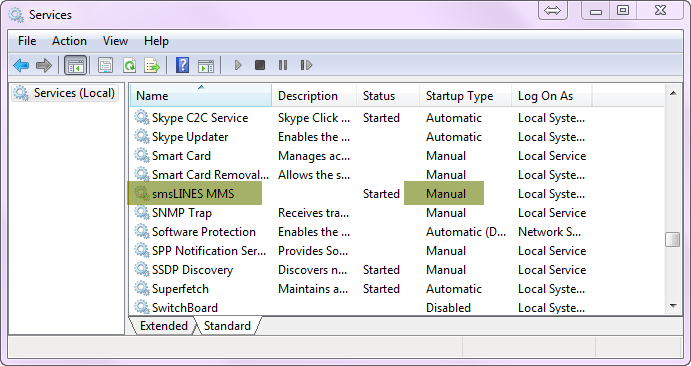
 From V8 another service is installed. The service is set to Manual and must remain so.
 Installing the Service on x64 Windows
If you install smsPULSE Server on windows x64, such as Windows 2008, you can refine your installation. Please read this document:
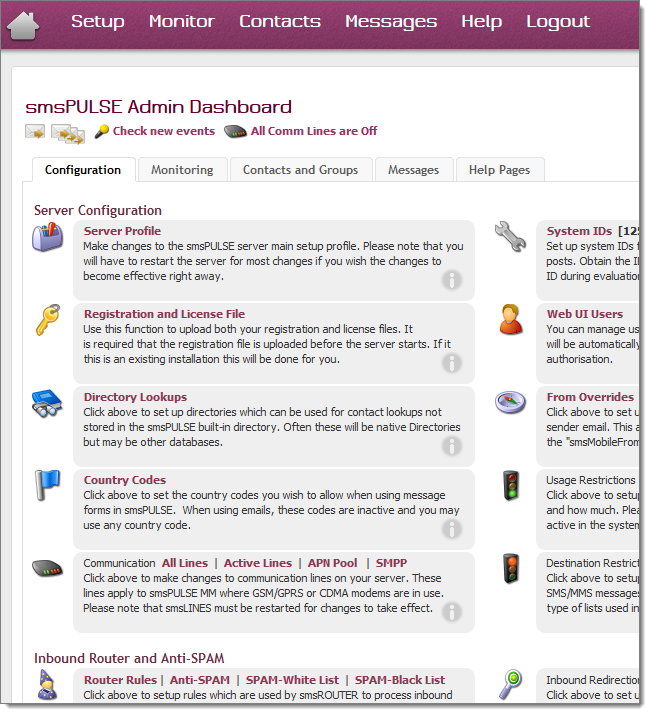
Login to Web UI
Once the installation is complete you can login to the system using a browser. The admin user name and password are:
Username: smswebadmin
Password: password
URL: http://127.0.0.1//smspulse/smswebui.nsf
From there you can define additional end users and advertise the presence of the server to those users.
Please note that to send your first SMS and obtain your evaluation allowance you will need to attach the registration file from smsPULSE.com to your installation. You can do so by downloading the file from your account record in smsPULSE.com and either attach it using the smsPULSE Web UI, or simply place the file in the smsPULSE data directory before you start the local server. We recommend you use the Web UI.
Installing the Service on x64 Windows
If you install smsPULSE Server on windows x64, such as Windows 2008, you can refine your installation. Please read this document:
Login to Web UI
Once the installation is complete you can login to the system using a browser. The admin user name and password are:
Username: smswebadmin
Password: password
URL: http://127.0.0.1//smspulse/smswebui.nsf
From there you can define additional end users and advertise the presence of the server to those users.
Please note that to send your first SMS and obtain your evaluation allowance you will need to attach the registration file from smsPULSE.com to your installation. You can do so by downloading the file from your account record in smsPULSE.com and either attach it using the smsPULSE Web UI, or simply place the file in the smsPULSE data directory before you start the local server. We recommend you use the Web UI.
 Enhancing your installation
Now that you have run the tasks above, all the system's databases have been created for you. Before you send your first SMS message follow the next steps:
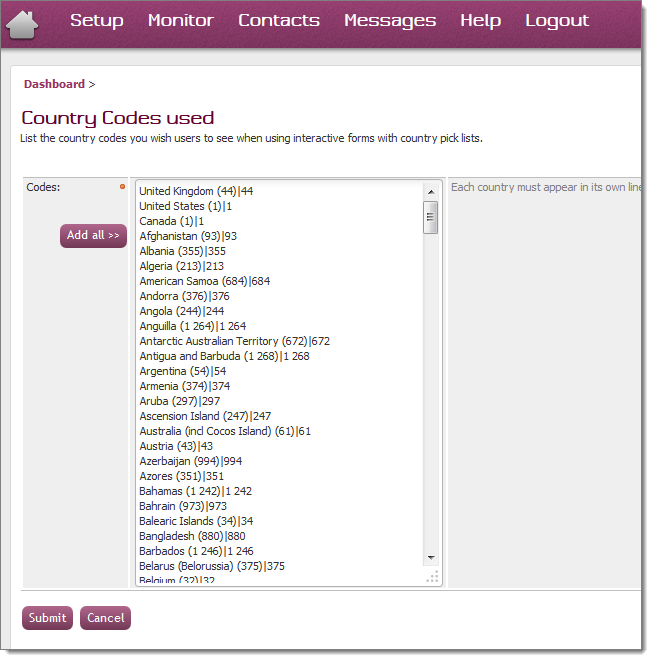
1. Create a list of Country Codes, click on the dashboard link
Enhancing your installation
Now that you have run the tasks above, all the system's databases have been created for you. Before you send your first SMS message follow the next steps:
1. Create a list of Country Codes, click on the dashboard link
 2. Click on "My Profile", top right of dashboard.
 Send your first SMS using the Web UI
Click on the single envelope to send a message. You may also wish to create some users and experiment with the directory.
With some luck, seconds later your mobile phone will receive your first message. Well done!
Taking your installation further
Now that you have sent your first message using the Web UI, it's time to explore additional features of smsPULSE. The general steps are:
Send your first SMS using the Web UI
Click on the single envelope to send a message. You may also wish to create some users and experiment with the directory.
With some luck, seconds later your mobile phone will receive your first message. Well done!
Taking your installation further
Now that you have sent your first message using the Web UI, it's time to explore additional features of smsPULSE. The general steps are:
- Configure the system to accept emails from mail clients.
- Update the system profile
- Configure the system to accept HTTP API calls
Now that you have enabled messaging for use in smsPULSE you can:
- Send an email to smsPULSE
- Post messages and update the directory using the HTTP API
Please note that your evaluation automatically uses our International Account type. If you are evaluating smsPULSE in the USA you will need to tell smsPULSE about this. To evaluate using a Qtel account please contact support@smspulse.com. For more information about different accounts please see her .
Receiving SMS messages
If you have GSM device configured, or had one purchased from us, you should now be ready to receive messages. Try the following:
- Send a message, indicating you wish the message to be sent using GSM
- Reply to the above message. The message will arrive to sms.IN and be processed by the router. The message will be forwarded to you by email.
- If you wish to explore the workflow functionality of smsROUTER you may like to try some "Routing Rules" .
Enabling smsPULSE with a full license
With smsPULSE, once you have bought your license, there is little to do to switch from "Evaluation Mode" to "Licensed Mode". The following easy steps are required:
- We email you a license file. The file is emailed with a "License Key".
- Use the Web UI to upload the license file
- Open the System Profile
- Paste the license key you received with the file into the appropriate field in the form.
- Submit the system profile
- Ask smsPULSE to restart by clicking on the appropriate checkbox at the bottom of the form.
- If you are using smsPULSE MM for either SMS or MMS, and employed a GSM device, you will also need a Cell Keys .
For more information on product enablement see .